Friday, May 30, 2008

Sport your favorite page


When I was doing my friends wedding album a while ago, I started this page and had so much fun creating...I think I spent a little over two hours on this one page! I didn't care because I was having so much fun! So I decided, since I'm putting so much energy into one page, I might as well "sport" it. So I went to Michael's and bought a plain wood 12x12 frame for 7 bucks, painted it black, distressed the edges and put the page in! It was a great added little something to give to my friend for their anniversary! Another thing you could do, is switch out the pages every so often to keep things updated, and it shows off a little talent and creativity as well!

Thursday, May 29, 2008

Hair Clips


I saw these cute hair clips on a website for $7.00 for two of them. I thought, I could make them just as cute for way less, and I did! I bought the metal hair clips at Sally Beauty Supply, a pack of 100 for $5.oo and the brads and Michaels 12 for $5.oo. And I already had the ribbon. So each clip came out to about $.50 a piece! I just hot glued the ribbon to the clip. I cut off the metal pieces of the brad and hot glued that to the ribbon on the clip...I'm also going to make more with just ribbon and some with buttons as well...so many possibilities!

Wednesday, May 28, 2008

Crayon Roll

So I have seen these crayon rolls for a while now, I just haven't had a reason to make one... until now! My little niece is turning two! I think this will be just perfect for her. I used a couple of different patterns, but mostly one from

http://skiptomylou.wordpress.com/2007/04/25/on-a-roll

I was in a hurry to make and send this off, so you get to see it without crayons. I know, pretty disappointing. But I'm making a few more because this one was so easy! I used a cute bright animal flannel on the back, a lilac flannel for the inside and a terrycloth chenille for the pocket(which I lined before hand. I used a pink grossgrain ribbon across the pocket and a separate pink ribbon for the tie.
And of course, I made a matching card. I love how it ties on the side just like the crayon roll does. I put patches of the animal flannel on the front and the back with a zig-zag stitch. Then stitched the ribbon across the front and back. Threw on some little stickers, stitched an inside to write on and it's done!


Saturday, May 24, 2008

A Birthday gift for Mom

I used the theme of our other memory gifts. This time I cut out tags from coordinating paper. I had my husband think of things he loved about his mom (since this is for her birthday) and memories he had of growing up with her. I typed up each one and sewed them on to each tag. I wrote the cover tag and embellished it with chalk , a stamp and ribbon. I then assembled it together on a ring, adding more ribbon!
Here are one of the tags!
I did 19 memories, plus the back and cover tags, making a total of 21 tags.
I wrote what the gift was for, who it was from and the year...That way, if she still has it years from now, she'll know exactly who gave the gift and when she got it!

Handwriting

I read that that handwritting book I posted a while ago. I did the exercises along with it and I absolutely LOVED IT! It was so much fun and I learned so many awesome techniques. I highly recommend purchasing the book. I will forever use what I learned in my future scrapbooking! I always looked at pages with the gorgeous writing and it made me sick to see good it looked and then reflecting my own writing and how I don't feel it's "good" enough. Anyway, I learned that you should ALWAYS write with pencil first and then with pen! Along with many other techniques, I now feel confident with my writing and MY many different fonts! Here is my first page after reading the book! I used different thicknesses of pens to give it more dimension. I also encorporated different fonts and sizes to give it that added touch! I cut out the title with sissors, but that's only because I didn't have a razor cutter to use. I never knew you could have so much fun writing!

Saturday, May 10, 2008

Sis. Beck's Book


I have this posted already on my family blog, but I thought I'd link the two together since this is my craft blog. I made this little book for my Relief Society to sign. We just wanted Sister Beck to know that we love her, support her and sustain her. It turned out really neat! I sent it off to Sister Beck the week before General Conference. I received a thank you note from her in return that next week! She really loved the book, but she loved most what we were hoping. The kind-hearted and thoughtful words that the book was full of for her. Thank you, Sister Beck for leading the women of this church in the way that only you could! We love you!

Here is the link to the page on my other blog if you want to see the rest of the book.

Just another birthday card

This is just another birthday card I've done for our Relief Society. I really do love being the secretary, it gives me so many opportunities create things! This is just rub-on wording on top of layers of different colored cardstock and stitched together. I added "glossy accents" to the wording to add a 3-D look. Then added a little ribbon bow and it's done!

Friday, May 9, 2008

Mother's Day Card

Here is my first attempt to sew on paper. I was just so inspired by Leslie and her beautiful creations! So here it...I made several of this card, for the grandma's and sister-in-laws. The "happy Mother's Day" and the circle of dots are fonts that I printed and the "m" is obviously a stamp. Thanks Leslie for showing me a new way to create! You rock!

Swaddle Me

I bought this flannel over a year ago and it's been just sitting in my craft room waiting to be made into blankets! I'm proud to say they're complete and ready to be given! I just need more friends that are pregnant! The blankets are approximately 40" x 40" and are perfect size for swaddling. I swaddled Tessa in these from when she was a newborn to about nine months...so they last a long time! The "tummy warmer" was an idea that my aunt got with her little one. It really does help to sooth the tummy for babies! So here are the gift sets...
I added the tag to sort of explain the gift and give instructions on the tummy warmer.

Mother's Day Gift: Part Deux

Alright, so here is the second part of my mom's gift. The 42 reasons jar just had snippits of reasons, short phrases. This book has the complete list of reasons for each child. This way she knows who each reason came from and what else they had to say about it.

I found this really cute scalloped Bazzill chipboard book and I couldn't pass it up. Then I just tried to find some matching papers that "looked" like my mom, you know soft, pretty & grown-up. I made it a 6x6 album. I just glue sticked the paper to the chipboard and then cut out the scallops on the paper, for each page. That was the only pain. I made a page for each of my ten brothers & sisters. I put a pocket on each page, zig-zag stitched on. Then I printed out their reasons to a 4x4 size, distressed, added a tab that matched their page, then added either a ribbon or a button. (Ribbon for girls and buttons for boys.)

For the front I stitched on some matching left-over paper and stitched together some strips of the colored paper, cut a heart out and stitched that on the front. I used rub-ons for the writing. Added a little label on the back, for that little extra. Then I just added the clip rings, tied some ribbon around, and there you have it. The book!

The front of the book.

The back of the book.

This just shows the reasons pages that are in each pocket. See the cute matching tab on top?

Another view of the front.
Deborah's page.
Steve's page.
Blair's page
Ryan's page.
Doug's page.
Janelle's page.
Brad's page.
Amanda's page.
Jared's page.
My page.
Another view of the back.

Burp Cloths


I think the best part about giving gifts is the presentation. I had so much fun making this cute matching tag. I simply used a scrap of the left over fabric and ribbon and created this (thanks to Leslie for the inspiration!) I thought the sewing added a nice touch since I sewed the burp cloths too! I got this cute scrap of flannel fabric on sale over a year ago, and it feels so good to have made something I'm really happy with! I made a gift set of three burp cloths 9" x 16" and added a little ribbon to give it a little somethin' extra! I love how they turned out!

Wednesday, May 7, 2008

Wedding Album-Part 4

The Honeymoon...was my favorite sections to do. I used really bright colors and was on a roll with my different layouts. I love the dynamic of the printed flowers on the paper and the fabric flower addition. They compliment each other nicely!
The circles below are of one picture. My Aunt Cindy has this really cool tool that crimps a frame around the circle. So I took a picture of a landscape and spruced it up a bit by using these circles...a little more interesting, huh?

Oh circles...how I love you! I LOVE this layout. The journaling around the circles are rub-ons...and the title "Ocean View" is made up of various chip board and acrylic letters.
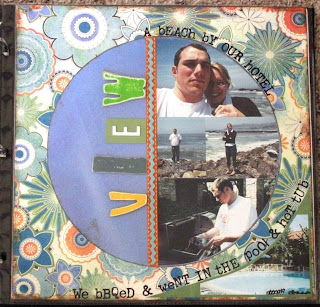
This was the last page of the whole scrapbook. It's important to end strong. This was their engagement picture.

Wedding Album-Part 3

I love tags...So I created a tag shape to frame the picture, and then used rub-ons to put their name at the bottom.


Wedding Album-Part 2

The pages are shiney because they are in page protectors...To get a closer look, click on the picture itself... I love thinking outside the box, "literally". Using circles to frame brings a whole new dimension to the page and the picture itself!


Before I started this page, I had all of the pictures of friends and family standing around on the temple grounds...I had so many, and none of them were really great, so I created a collage layout. I love doing collages because you get a lot of pictures on the page without it feeling like there's too much. And, in this case, the theme of the pictures goes well with the layout.