Friday, June 27, 2008

Wall Organizer & a 3 Hour Nap

Well, my daughter decided to take a three hour nap today, so I was able to catch up on a few things. This project being one of them. It is a wall organizer for her room back in Moscow. The colors in the fabric match her room perfectly. All I need to do now is find a curtain rod and paint it green to match for it to hang on.


I think the dimensions were 21"x 28". I just cut the pockets out whatever size I thought looked good. I ended up doing six pockets, three big, three little. I stitched some ribbon on to the tops of each pockets. I added pink tied bows on to the smaller pockets for a little bit more pop. I made three tabs for the top so it could hang on a curtain rod or in her closet. I made them 6"x 4".

Cut out two large rectangles 21"x28" and your pockets, and three or four squares for the top tabs.

Fold over 1/2" and iron on each pocket. Pin in place where you want pockets. Sew pockets in place. Iron.

Pin tabs in place on top of this rectangle.

Put other rectangle on top of this one and pin in place. Make sure fabric is right sides together. Do the basic straight stitch all around this rectangle, leaving an opening to turn it out through.

Turn it out and iron. Top stitch all around. You're done!

(I also stitched around my pockets twice once it was all done to secure them to the back. It makes it hang better. And I top stitched twice around the whole organizer, just because I like the look of it.)

Tuesday, June 24, 2008

Baby blue....shirt!

I am having so much fun sewing for my daughter. I used a basic dress pattern for this shirt. (I used less than a yard of fabric. Here's a few things I altered from the dress pattern:
  • Instead if doing the length of the dress, I just shortened it to the length of a long shirt.
  • Instead of gathering at the waist line, I did a few pleats.
  • Instead of using a zipper for the back, I used buttons with ribbon loops.
  • I added a collar, just a strip of fabric that I gathered.
  • I added the ribbon across the waist line and a bow with some buttons.


Sunday, June 22, 2008

Perfect Pink Blankie

Evie loves her pink silky blankie from Target. My friend Amber taught me a fun new way to make a baby blanket, so I tried it out using the minkee & flannel backed satin. For the first blanket, there were a few puckers, but I still think it turned out so cute. I made it for my sister's new little girl. It will be such a soft blankie for her. I want to make a big one for me!
All laid out.

All tied up with a tag.

General Directions:
You need 2 squares or rectangles, one bigger than the other with equal distance on either side. I used the dimensions of 27"x 27" for the small square & 45"x 45". That means you should buy a 1 1/4 yd. for the main fabric & 3/4 yd. for the middle.

I then ironed each square in half and then in half again--to find the middles of each side. (Just picture a square divided in half widthwise & lengthwise.) Then match the middle of smaller square to middle of larger square. (Your fabric should be facing right sides together.) Then sew a straight stitch from the middle to the end of the smaller square on both sides. Then repeat on all sides. Leave an small opening on one side to turn the blanket inside out to finish.

Then lay out your blanket so the excess main fabric is laid out equally around the smaller square. Iron to make a nice crease. You will notice you have these flaps of fabric on each corner. You need to iron these corners to make a diagonal crease. It will be one crease but you need to iron in two directions to make this crease. Straight stitch on this crease, for each corner. Trim the excess fabric. Turn inside out.

And iron one more time all the way around the blanket. And to finish, stitch around the smaller square to secure the blanket together, being sure to stitch over the small opening to close it up good. One day I'll have nice tutorials, but these will have to do for now. Sorry!

Yet another baby gift.  But this one is for my good friend, my old college roommate Chels.  She is about to have a baby and I am so excited for her!  So I finally got around to making her one of these, I hope she likes it.  I love the material, it's a yellow and gray Amy Butler fabric.  It is so cute I want to go buy more and make something for me with it!
Here is the changing pad, all rolled up and tied to fit in a diaper bag.

Here is the nursing cover, made with a little inside pocket as well.

Here is the changing pad all laid out on the outside so you can see. It is the fabric and two strips of canvas for the outer edges. The inside fabric is the waterproof flannel material, it's GREAT!

And of course, another little matching card.  

Saturday, June 21, 2008

all DRESSED up

I was online looking at some fashion websites for children's clothing and totally got a burst of inspiration. I love to do a variety of crafts, but last night, I wanted to design and sew. I came across the most gorgeous clothing for little girls...simply breath taking, truly an art. You can find these beautiful clothes here. After reviewing what dresses I had seen, I was already creating something I could make for Tessa. A spring dress with a color that you don't normally see on babies and toddlers...black. I have so much fabric, I just simply picked something out that I liked and began to design. This is definitely my FAVORITE creation yet. I hope you enjoy. It was very easy to make and only took me a couple of hours. I made it in one evening and will probably make more since they're perfect summer dresses. I used a basic black polka dot cotton. I lined only the bodice and zig zaged the hem. I used a yard and a quarter of fabric.

I love how the dress is long. It's hard to find dresses that are just the right length!
To close the back of the dress, I used round buttons, with ribbon loops. I did this for two reasons, 1) it's much easier than button holes, snaps, or a zipper. 2) I really like how it looks because it's not something you see on clothing very often.
Instead of making straps, it was much easier to use ribbons to make bows! The bow is securely sewn on so they cant come undone!To bring some color to the dress, I added this pin which is removable. I hot glued these buds together and sewed on a button in the center. I then glued it to the pin. I like this feature because I can make other pins with different flowers on them to give it a whole other look!

Wednesday, June 18, 2008

make ordinary extra-ordinary...


I
went to my aunt's recently and noticed an array of colorful flowers on her work desk. I asked her what the occassion was, and she replyed, "I'm sick of my boys taking all of my pens and never putting them back!" I just laughed! What a great idea! I have the same problem--I'm always loosing my pens. This not only makes them a little more noticable, it also gives a little color and uniqueness to them! I held the flower stem as I wrapped floral tape all the way down the pen and there you go, a beautiful pen! I love them and they make me happy just looking at them on my desk! My husband also enjoys them...hehe!

Monday, June 16, 2008

Top 10 Reasons Why I Love My Daddy

Alright, so here is Paul's Father's Day present. It's a top ten count down book of why Evie loves her Daddy. It is a 6x6 album, made from cardstock. I first picked my pictures for each reason, put them together with the page & picked a picture or two, then made a space for the number & last I made the textbox the size I needed to fit. Then I sanded & distressed the pictures & wording. I used BasicGray chipboard letters & numbers which I covered in different green Bazzill to match the paper. I sanded & distressed each of them. Then I zig-zagged the writing and straight stitched the number squares in a pretty green thread. Then I made him a matching card to go in the last page, which I made into a pocket, so he can always keep the card together. Then I backed the pages with each other and stitched around edges to make it more sturdy. And last, I tied on some brown colors of hemp and "man-ribbon" on the rings. I love how the brown & green colors all went together so well!

Album cover

Dedication & Reason 10

#9 & 8

#7 & 6

#5 & 4

#3 & 2

#1 & pocket page

Father's Day card

Album back

Tweaked

This is the updated, tweaked version of the card I made last week.

Friday, June 13, 2008

Oops


Okay so this is not mine, I borrowed this picture. But it's only because I was a dork and forgot to take a picture of my dad's father's day gift! I'll have to get a picture when I'm home in July. But this is the item that I used to create the gift.
This is a business card holder. Has little plastic sleeves in it to hold them. I just covered the front with a red plaid paper, distressed it, and added a square of white cardstock with a father definition printed on it. There were ten descriptions in the definition, one for each of the "card holder" spots. Then I used a chipboard "F" covered in blue cardstock on top.

Then for every card spot, I printed out a word like "patriarch" to glue on the front page. Then for the back of the page I just printed out my own "definition." I just used stories or thoughts I had about him with this role of father.

I know, it is hard to visualize but I promise it turned out super cute!! I just wish I had taken pictures. Luckily I still have Paul's gift... but I can't post anything about that until after Father's Day.

Wednesday, June 11, 2008

Free Vinyl Wall Decals

Hi Everyone, I stumbled upon this blog. Anyone who likes vinyl wall decals should totally check this out. She has some great stuff in her store. Plus, if you blog about her website before the 12th, she will give you your choice of vinyl for free!

A) your color choice(s) for two small monkey decals
or
B) your color choice for a set of bird decals (one color for 3)
or
C) your color choice for a small rocket ship decal
or
E) either olive green or apple green small fun leaf decals

Visit her blog to see how to get some! www.creatingcupcakes.blogspot.com

Check out her website to see all of her items. She has some really cool things. www.vinylwallart.com

Father's Day Card

One of my all time favorite things is gift giving. I really try to give something that I know the person is going to like! In this case, my dad loves my daughter Tessa! I wanted to do something inexpensive and from the heart. So I compiled several videos of Tessa over the past few months and made it into a 30min video for him. I made this pocket for the dvd case to go in...and the outside pocket is for the card to go in.
I saw something similar to this card a few years ago and have always wanted to try it. It was fairly easy to make and didn't take very much time. Instead of doing a regular size card, I just cut it down to a square, just to change it up a bit.
I know my dad is going to love his Father's Day gift. My number 1 rule is always love what you make before you give it to other people. Be confident in your gift giving!

Monday, June 9, 2008

Arrangement


I love flowers! They are such an inspiration of creation and they, of course, bring a smile to my face. I got these flowers for my birthday...I received them in the usual way....flower.stem.vase. They were so beautiful and I thought it would be fun to enjoy them a little differently. Instead of the usual flower arrangement (in a vase), take a floral foam block and cut it down to 2 1/2 x 2 x 2 1/2. I got it at the dollar store...so you can get them really inexpensive. In the process of making this, I was surprised at how many flowers you need to how small the foam ends of being. I used approximately 35 mini roses. I cut the stem to about an inch away from the flower and stuck them in the foam accordingly. I added the bow on the top to hang in my kitchen! I love how it turned out. The next time you get flowers, try something new like this!

Friday, June 6, 2008

ABC Book

I've been wanting to do an ABC book for Tessa and the rest of my future kids for a long time now. But I wanted to do a book with pictures of Jason and I as kids. So when my kids look at the album, they see baby pictures of us! So I started the task last weekend and just finished a couple of days ago. It took 30 hours, but I really wanted a sturdy, nice album.....so here it is!

The album is 9 x 9. I distressed EVERYTHING! and sewed almost everything on. I used a zig zag and straight stitch with different colors of threads (brown, yellow, red.) I used an assortment of embellishments, brads, buttons, ribbon, and my own little creations! I also used a lot of mounting tape to give it dimention. ENJOY!


a & b - airplance, apple, ant, bridge, baseball, birthday, button, brads, buttefly
c & d - chair, curlers, cake, dance, daddy, ducks
e & f - eat, eyes, flowers, family
g - grass, grandma, grandpa, grow, graduate
h & i - hair, horse, hat, hand, ice creamj & k - jason, jack-o-lantern, jar, jelly beans, kids, kite, kittyl & m - learn, laugh, ladder, ladybug, mommy, missionary, music
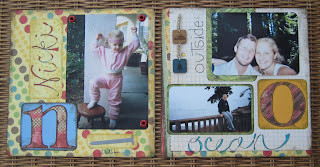
n & 0 - nicki, nail, outside, oceanp & q - pancakes, pig, quilt, queen r & s - rest, rodeo, rain drops, ribbon, sand, snail, sister, santat & u - tree, t-shirt, umbrella, unclev & w - violin, vest, vase, worm, watermelon, winter, water polo, wavesx & y - eXplore, xoxo/huges & kisses, yarn, yo yo

z - zebra, zoo, zzzz (sleepy time!)

I wanted to sew a cover out of some cute fabric I have, but thought that it would be better to have something even better. I already had this cute leather binder that ties closed....perfect! I was also debating on weather or not I should put the pages in page protectors because I wanted my kids to be able to touch and feel the pages, but in order to preserve my 30 hours of work, I opted to use them anyway!

Thursday, June 5, 2008

Just made a few more cards. I have been doing some other crafts, but haven't taken any pictures yet, so more to come later I guess. Some of the crafts have already been made, shipped & received... so I missed the boat on that one. Sorry, guys. I'll get better at this I promise.


This is just a simple card I made for my husband's friend. His brother had passed away, so I just did a simple little sentiment card.


This is a birthday card I made for my mother-in-law. It turned out pretty cute. I have since made a few more cards for my relief society birthdays and revamped the card a bit. I'll show those later.